
Creator Tips
Why Your Email List Is Your Most Valuable Asset (And How)
July 14, 2026
Learn a 90-minute batch workflow to script, shoot, edit, and schedule a full week of YouTube videos in one focused block.
If your YouTube process feels like it stretches across days (or weeks), your output will always be inconsistent. The fix is a repeatable system that compresses decisions, reduces setup friction, and lets you focus on shipping. This guide breaks down a 90-minute batch workflow that takes you from script → shoot → edit → schedule one week of YouTube in a single focused block.
Batch workflows succeed or fail on preparation. Before you ever hit record, create 2–3 repeatable video formats you can reuse. Examples: “Problem → Fix → Proof,” “Story → Lesson → Next steps,” or “3 mistakes → what to do instead.” Reusing structure helps your brain move fast because you’re not reinventing the wheel each time.
Next, define your default production kit. For most creators, that means: a consistent frame (camera tripod position), one lighting setup, and a stable audio method (even if it’s a budget mic). The goal is to reduce “setup time” to under 5 minutes. If you routinely spend 15–25 minutes adjusting lights and audio between takes, your 90-minute plan will collapse.
Finally, decide your weekly output target. A realistic example is 4 videos per week (Mon–Thu) at 6–12 minutes each, plus one Short or community post. You’re not trying to make perfect content in one sitting—you’re trying to create a repeatable throughput engine. Even a modest increase in cadence can compound. A common creator benchmark: consistent publishing often improves long-term watch time patterns, and more uploads generally increase the number of tests the YouTube algorithm can run on your channel.
The first half of the block is where most creators waste time. They write intros, then rewrite hooks, then adjust title ideas, then suddenly it’s 45 minutes later and the camera still isn’t on. Instead, use a single “script pass” for all videos. Aim for one script per video but don’t over-edit the words. You’re generating a structure you can deliver.
Use a consistent script template that includes: a hook (first 10–15 seconds), a promise (what viewers will learn), 3–5 core points, and a closing CTA. Include optional lines where you might add personality (e.g., “If you’re struggling with this, you’re not alone…”). Those optional lines become your “natural filler” when delivery needs a little pacing.
Example batch plan (4 videos):
Minute 0–20: Write Video 1’s script (500–800 words spoken). Then duplicate the structure for Video 2–4 and fill in the unique sections.
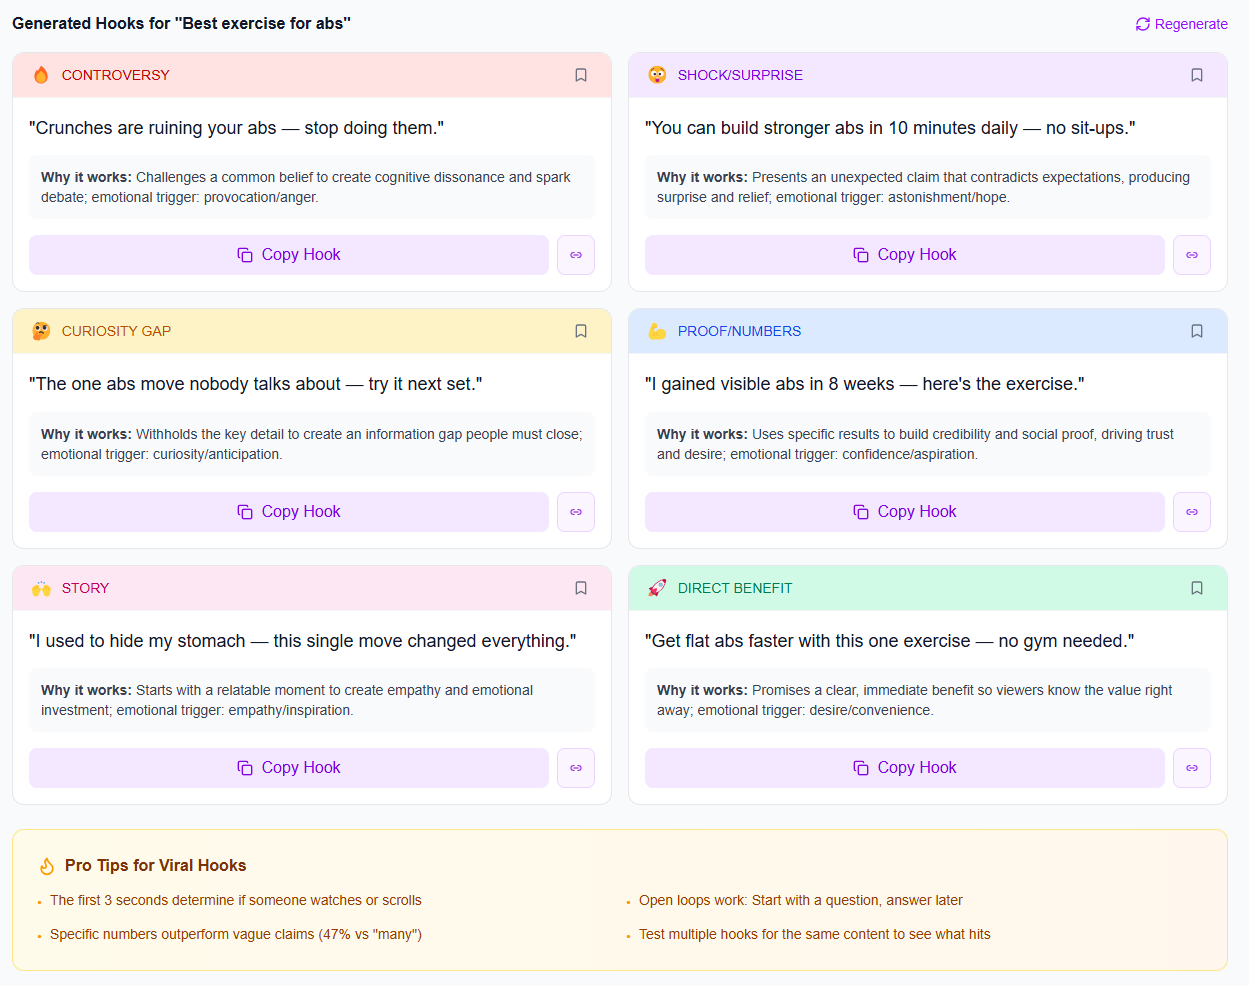
Minute 20–35: Hook pass. For each video, craft 2 hook variations and pick the one that feels most specific. If you want a practical rule: hooks should mention a measurable outcome (“in 7 days,” “without spending,” “stop doing X”) or a clear audience (“for faceless channels,” “for small YouTubers”).
Minute 35–55: Create quick “shoot notes” for each video: camera framing reminder, b-roll cues, and where you’ll place on-screen text.
Minute 55–90: Shoot all four videos back-to-back without changing your setup. Do 2 takes max per section, then keep moving. If a sentence goes wrong, pause, reset your breath, and continue—don’t rework everything. Editing later will handle the cleanup.
Editing is where creators either speed up or spiral into perfectionism. A batch workflow needs “good-enough” standards. Think in terms of retention-critical edits (things that impact watch time) versus “nice-to-haves.” Keep retention-critical items non-negotiable: remove long dead air, tighten transitions, and keep the main idea visible. Nice-to-haves include fancy motion graphics, perfect color correction, and custom sound design for every line.
A practical batch editing checklist for each long-form video (6–12 minutes):
1) Import + auto-transcribe: This gives you timestamps and a searchable transcript for cuts.
2) Trim silence: Delete dead air and “thinking” pauses—aim for a fast pace. If you’re seeing average drop-offs in the first minute, tighten the intro by 10–20 seconds.
3) Cut to the point: Every 30–60 seconds, ensure something changes visually or narratively: an example, a shift in perspective, or an on-screen key takeaway.
4) Add chapter markers: Chapters help viewers navigate and can improve engagement signals. If your audience watches on desktop or mobile, chapters are often underutilized.
5) Thumbnail + overlay titles: You don’t need professional design, but you do need clarity. Overlay titles should mirror your video’s promise (“How to transition from side hustle to full time,” “Stop losing views to this mistake”).
For batching, limit your workflow per video to a time cap. Example: 35–45 minutes per 6–10 minute video, which gives you enough time to finish four videos in a day. If you’re going beyond that, simplify your effects and cut the number of b-roll layers. Many creators underestimate how much “visual busy-ness” can distract from the message. A clean layout often performs better than over-designed edits.
Retention reality check: YouTube rewards signals like watch time and audience satisfaction, but you can influence them directly. Tight pacing and immediate value delivery matter because viewers decide quickly whether to stay. The YouTube algorithm 2026 continues to reward content that earns sustained attention—not just clicks. Batch editing helps you be consistent with what you can control: speed, clarity, and structure.
Scheduling isn’t just hitting “publish later.” It’s where you increase the odds that your videos are discovered and clicked. After you edit each video, lock metadata fast so you don’t end up rewatching and overthinking.
Use a metadata framework that matches how people search. For each video, write:
Title formula: Outcome + timeframe/audience + specificity. Example: “Best Software for YouTubers (2026): My Setup for Faster Editing” or “How to Get More Views: 5 Fixes You Can Apply Today.”
Description framework: First 2 sentences should summarize the video’s result and who it’s for. Then add bullet points for what they’ll learn. Include a short CTA that doesn’t feel desperate.
Chapters: 4–8 chapter segments aligned to your script sections.
Tags and hashtags: Choose a small set of relevant tags; don’t stuff unrelated terms. A hashtag tool can help you find hashtags that actually reach people, rather than generic tags that bring low-intent traffic.
Then schedule for one full week. If you upload 4 times, pick a repeatable pattern (e.g., Mon/Wed/Fri + one weekend). Your job is to remove variability. Viewers and the platform can more accurately learn the rhythm of your channel when your schedule is consistent.
To support this system, consider a structured approach to your content creation tools 2026 needs: a fast editor, a thumbnail workflow, and a planning tool to avoid last-minute chaos. If you’re unsure where to start, Social SEO: How to Get Found Without Going Viral is a strong companion read for pairing scheduling with discoverability.
Batching doesn’t make you less creative—it makes you more consistent, and consistency is what turns “random uploads” into a real YouTube channel.
To make this workflow sustainable (not just a one-time “productivity win”), iBuildInfluence helps you plan, produce, and distribute without bouncing between tools. For scripting and ideation, use Content Generator to turn one idea into full script drafts (including hook, structure, and CTA), then refine hooks with Hook Lab, which generates and scores multiple options so you can pick a high-retention opener quickly. That directly supports the “script the week in one pass” portion of the 90-minute block.
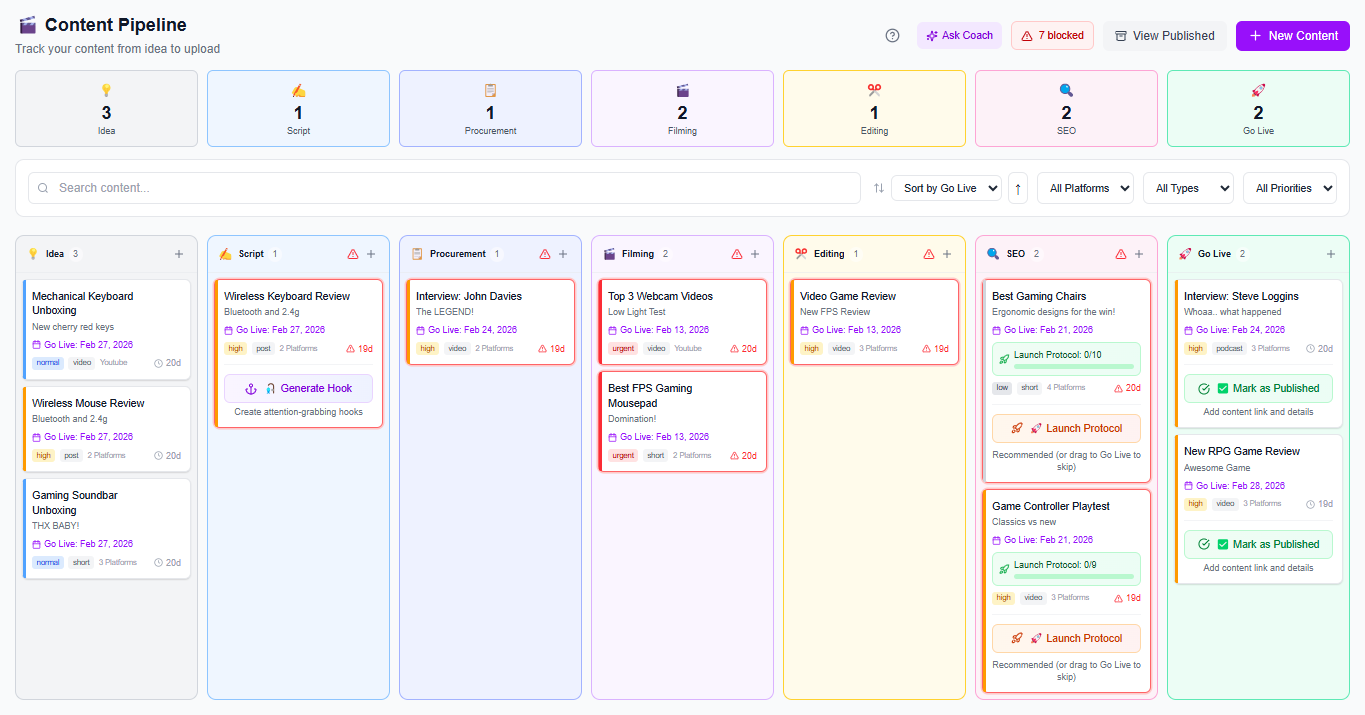
For the scheduling and consistency part, use Content Planner & Content Queue to map your week of uploads and auto-schedule so you don’t lose momentum after editing. And once videos go live, Social Statistics helps you see what’s actually performing across platforms (not just views), including engagement rate and reach—so your next batch improves faster. If you’re scaling, this is also where having a repeatable creator content workflow matters.
Keep your structure consistent, but vary your delivery energy and examples. Record in sections: one “energy level” take per point, then switch to a new take style for the next segment. Also, leave room in your script for natural filler so the video still feels human.
Use a good-enough pipeline: trim silence, tighten transitions, add chapters, and ensure the on-screen text matches the spoken promise. Set time caps per video (for example, 35–45 minutes each) and prioritize retention-critical edits over advanced effects.
Write titles and descriptions immediately after editing each video, using a simple formula tied to the viewer’s outcome. Add chapters and overlays consistently, then schedule right away with a content queue so you don’t keep rewatching and delaying publish time.
Templates win: reuse 2–3 video formats so your scripts don’t start from scratch.
One block, one setup: script the week in one pass, then shoot all videos back-to-back.
Edit for retention, not perfection: tighten pacing, trim dead air, and keep visuals aligned to your promise.
Metadata fast + consistent: titles, chapters, and descriptions should be locked right after editing.
Schedule immediately: use a content queue to protect your output cadence and reduce last-minute decision fatigue.
Found this helpful? Share it:
iBuildInfluence Team
Creator growth strategist at iBuildInfluence. Helping content creators land brand deals, grow their audience, and build sustainable creator businesses.
More from iBuildInfluenceJoin thousands of creators using iBuildInfluence to land brand deals, grow their audience, and build real income.
Start Free ΓÇö No Credit Card Required